
Showing posts with label embossing. Show all posts
Showing posts with label embossing. Show all posts
Tuesday, May 12, 2015

Saturday, February 28, 2015
What Color is This Dress?


The latest social media craze inspired me to create a couple of fun, silly cards. If you haven't yet seen "the dress," click the photo below for an interesting article on the subject.

So, which colors do YOU see? ;) I saw the original (middle) photo as white and gold. My informal research found that men are more likely than women to see the original photo as blue & black. The brain is an amazingly interesting organ!

Paper: Whisper White CS, Early Espresso CS, Brushed Gold CS, Gold Fancy Foil Designer Vellum
Tools: Dress Up Framelits, Filigree Frame Textured Impressions Embossing Folder, Big Shot
Accessories: Gold Sequin Trim, Glue Dots, Stampin' Dimensionals
italics = retired product

The lace was a nightmare to adhere onto the back of the dress. I ended up cutting out two blue dresses and sandwiching the lace ends between them. Hopefully it won't unravel!
Paper: Pacific Point CS, Basic Black CS, Basic Gray CS
Tools: Dress Up Framelits, Filigree Frame Textured Impressions Embossing Folder, Big Shot
Accessories: Raven 1/2" Lace Trim, Fast Fuse Adhesive, Stampin' Dimensionals
italics = retired product
Built for Free Using: My Stampin Blog
Tuesday, November 19, 2013
From Our House to Yours
The Snow Festival Designer Series Paper from last year's Holiday Catalog is so much fun! I wanted to use the pattern with little houses on it, and I found the perfect sentiment to match. I'm entering this clean-and-simple card into the Curtain Call Challenge: CAS-ual Christmas.

I thought Primrose Petals would be a fun, non-traditional Christmas card color. On both the front and inside of this card, I stamped in VersaMark ink, then heat embossed with white embossing powder.

The inside uses the new Endless Wishes photopolymer stamp set. The coolest thing about photopolymer stamps is that they are COMPLETELY see-through! So you don't even need a Stamp-a-ma-jig, because once you ink it up, you can see exactly where you are going to stamp! (Well, it was a little difficult when using VersaMark, since it is also clear. But with normal ink, you're good to go!)

You know I made a matching envelope! :)

My Sweet Season stamp set is for sale. Click here to see it on Etsy, along with many of my handmade card sets!

Stamps: Sweet Season, Endless Wishes
Paper: Snow Festival DSP, Primrose Petals CS
Ink: VersaMark
Tools: Extra-Large Oval Punch, White Stampin' Emboss Powder, Heat Tool, Embossing Buddy, Big Shot, Envelope Liners Framelits
Accessories: Stampin' Dimensionals
italics = retired product

I thought Primrose Petals would be a fun, non-traditional Christmas card color. On both the front and inside of this card, I stamped in VersaMark ink, then heat embossed with white embossing powder.

The inside uses the new Endless Wishes photopolymer stamp set. The coolest thing about photopolymer stamps is that they are COMPLETELY see-through! So you don't even need a Stamp-a-ma-jig, because once you ink it up, you can see exactly where you are going to stamp! (Well, it was a little difficult when using VersaMark, since it is also clear. But with normal ink, you're good to go!)

You know I made a matching envelope! :)

My Sweet Season stamp set is for sale. Click here to see it on Etsy, along with many of my handmade card sets!

Stamps: Sweet Season, Endless Wishes
Paper: Snow Festival DSP, Primrose Petals CS
Ink: VersaMark
Tools: Extra-Large Oval Punch, White Stampin' Emboss Powder, Heat Tool, Embossing Buddy, Big Shot, Envelope Liners Framelits
Accessories: Stampin' Dimensionals
italics = retired product
Sunday, November 10, 2013
Patchwork Cards
I've had the idea for these cards for a long time. (I may have seen it on a blog or on Pinterest, but I definitely don't know where it originally came from.) Last time I was a demonstrator (4+ years ago), I used to always get a Designer Series Paper sampler with each new catalog. (Another demonstrator would put this together.) This consists of a 2.5x3.5-inch piece of DSP in every single pattern available. It is super fun to be able to see all the paper in person, as they ALWAYS look better than in the catalog. However, with all of the retirements over the years, I now have about a 4-inch tall stack of these little DSP rectangles.

So, when I fall into a stamping lull, I try to pull these out and figure out what to make with them. (This type of card is one of my favorite layouts, and lends itself well to using these rectangles up, because you can get four 1-1/4" punches out of each piece.) The current Simon Monday Challenge was just the push I needed to make this card idea a reality! This week, the challenge is "Patchwork". I'm also entering this card into the Loves Rubber Stamps Blog Challenge #77 (LRSBC77) - the challenge is anything goes.

My mom is always asking me for more "all-occasion" cards. She likes blank cards, with no sentiments, because you can really use them for anything: thank you, sympathy, thinking of you, etc. So that's the idea with these cards. To make them, just punch out 12 squares (1-1/4") from ~6 different patterns of DSP in a pack. Arrange them in a pleasing pattern. Then, using a glue stick, adhere them to a piece of cardstock or scrap paper. (You could also use SNAIL or another adhesive. Cardstock is better than computer paper because the DSP is pretty thin, and you don't want your Top Note to be flimsy.) Run through the Big Shot to create the Top Note shape, wrap some ribbon around it, and voila!


I wanted to use the 1/4" Stitched Grosgrain Ribbon, so I chose DSP that matched the colors I have. I also tried something different with half of the cards. After I ran it through the Big Shot to get the Top Note shape, I ran it through the Big Shot again in one of the embossing folders! I REALLY like these better. Don't you think it makes them look like an actual quilt??


The only disappointing part about these cards is that I don't have any DSP pieces large enough to make envelopes or even envelope liners! Boooo. :(
Paper: Berry Bliss DSP, Urban Garden DSP, Raspberry Tart DSP, Bella Birds DSP, Purely Pomegranate CS, Brocade Blue CS, Close to Cocoa CS, Rose Red CS, Crumb Cake CS
Tools: Big Shot, Top Note Bigz Die, Petals-a-Plenty Embossing Folder, Square Lattice Embossing Folder, 1-1/4" Square Punch
Accessories: 1/4" Stitched Grosgrain Ribbon (Basic Gray, Pretty in Pink, Whisper White), Glue Dots (to hold the ribbon in place)
italics = retired product

So, when I fall into a stamping lull, I try to pull these out and figure out what to make with them. (This type of card is one of my favorite layouts, and lends itself well to using these rectangles up, because you can get four 1-1/4" punches out of each piece.) The current Simon Monday Challenge was just the push I needed to make this card idea a reality! This week, the challenge is "Patchwork". I'm also entering this card into the Loves Rubber Stamps Blog Challenge #77 (LRSBC77) - the challenge is anything goes.

My mom is always asking me for more "all-occasion" cards. She likes blank cards, with no sentiments, because you can really use them for anything: thank you, sympathy, thinking of you, etc. So that's the idea with these cards. To make them, just punch out 12 squares (1-1/4") from ~6 different patterns of DSP in a pack. Arrange them in a pleasing pattern. Then, using a glue stick, adhere them to a piece of cardstock or scrap paper. (You could also use SNAIL or another adhesive. Cardstock is better than computer paper because the DSP is pretty thin, and you don't want your Top Note to be flimsy.) Run through the Big Shot to create the Top Note shape, wrap some ribbon around it, and voila!


I wanted to use the 1/4" Stitched Grosgrain Ribbon, so I chose DSP that matched the colors I have. I also tried something different with half of the cards. After I ran it through the Big Shot to get the Top Note shape, I ran it through the Big Shot again in one of the embossing folders! I REALLY like these better. Don't you think it makes them look like an actual quilt??


The only disappointing part about these cards is that I don't have any DSP pieces large enough to make envelopes or even envelope liners! Boooo. :(
Paper: Berry Bliss DSP, Urban Garden DSP, Raspberry Tart DSP, Bella Birds DSP, Purely Pomegranate CS, Brocade Blue CS, Close to Cocoa CS, Rose Red CS, Crumb Cake CS
Tools: Big Shot, Top Note Bigz Die, Petals-a-Plenty Embossing Folder, Square Lattice Embossing Folder, 1-1/4" Square Punch
Accessories: 1/4" Stitched Grosgrain Ribbon (Basic Gray, Pretty in Pink, Whisper White), Glue Dots (to hold the ribbon in place)
italics = retired product
Thursday, November 7, 2013
Autumn Wreath & Cards (& Sale!)
Stampin' Up! is continuing their Weekly Deals! Every Tuesday, look for new items on sale! Here are this week's items:
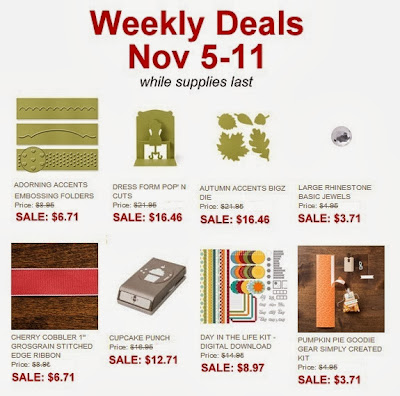
My favorite of these items is the Autumn Accents Bigz Die. This is a MUST-HAVE. Check out this awesome wreath I made using this die with Stampin' Up! cardstock and Designer Series Paper. I'm entering my wreath into the current Crafty Creations Challenge - Autumn Colours, and the Crafting for All Seasons Challenge #64 - also Autumn Colours.

Doesn't it look so nice against the natural wood of my current apartment door? :)

I got a styrofoam wreath from Michael's and just used straight pins to attach all the leaves. I made sure to first kind of wrap them around to coat the wreath itself, so the green styrofoam wouldn't show through. Then I just continued adding leaves until I was happy with the look! I wish I had kept track of how many leaves it took, but I did not. My guess is... maybe 150?


Here are some cards that also use the Autumn Accents Bigz Die. This first one uses the Adorning Accents Embossing Folder, which is also on sale.


My favorite of these items is the Autumn Accents Bigz Die. This is a MUST-HAVE. Check out this awesome wreath I made using this die with Stampin' Up! cardstock and Designer Series Paper. I'm entering my wreath into the current Crafty Creations Challenge - Autumn Colours, and the Crafting for All Seasons Challenge #64 - also Autumn Colours.

Doesn't it look so nice against the natural wood of my current apartment door? :)

I got a styrofoam wreath from Michael's and just used straight pins to attach all the leaves. I made sure to first kind of wrap them around to coat the wreath itself, so the green styrofoam wouldn't show through. Then I just continued adding leaves until I was happy with the look! I wish I had kept track of how many leaves it took, but I did not. My guess is... maybe 150?


Here are some cards that also use the Autumn Accents Bigz Die. This first one uses the Adorning Accents Embossing Folder, which is also on sale.


Sunday, August 2, 2009
Monochromatic Christmas
I was a little skeptical about Stacey's very first Curtain Call Color Challenge. But I think I pulled the colors together quite nicely. Looking at this card makes me think of the song "Silent Night." It's just so peaceful and serene. I popped up a few of the snowflakes on dimensionals to give it depth. Also, all the stamped images were embossed in white.


The new Christmas Punch set is so awesome - every single image fits into a Stampin' Up! punch! The only way to get this set is to host a qualifying workshop. Book one today to get this set early enough to make those Christmas cards!

Christmas Punch; Item #115366; Hostess Level 2
Supplies: Christmas Punch Stamp Set; Night of Navy, Not Quite Navy, and Whisper White cardstock; VersaMark Ink; Wide Oval and Boho Blossoms Punches; Whisper White 5/8" Satin Ribbon; White Stampin' Emboss Powder; Heat Tool; Mini Glue Dots; Stampin' Dimensionals
Wednesday, July 29, 2009
In Color Autumn
I loooooove the way this card turned out!! I used 3 of the new In Colors - I think they go well together (they remind me of Reese's Pieces!). I sponged each color onto the main panel - I tried to keep the brown shade near the bottom (for the ground), and the yellow & orange shades in the sky, to make it look like it's around sunset. I'm very pleased with the result.

I stamped the greeting in Craft Ink (in a darker shade of brown), which I thought might stick better to the textured cardstock.

I first stamped the trees in Craft Ink, then used clear embossing powder to emboss them, before I did the sponging.

Supplies: Heard from the Heart Stamp Set, Lovely as a Tree Stamp Set; Crushed Curry, Dusty Durango, and Very Vanilla cardstock; Soft Suede Textured cardstock; Crushed Curry, Dusty Durango, and Soft Suede Classic Stampin' Pads; Chocolate Chip Craft Stampin' Pad; Stamping Sponges; Clear Stampin' Emboss Powder; Heat Tool; Stampin' Dimensionals
Subscribe to:
Posts (Atom)