Showing posts with label thank you. Show all posts

Friday, November 22, 2013

Business "Thank You"

Work and "real life" has been interfering with my stamping time this week! ;) Here is a very simple project. I LOVE the Another Thank You photopolymer stamp set - especially the really large image. It is so elegant, you don't even need much other detail! I made this card to use for work. The blue is my company's "color," and we are sending these to businesses we worked with last month.


Stamps: Another Thank You
Paper: Whisper White CS
Colors: Pacific Point Ink
Tools: Ticket Corner Punch 
Accessories: Stampin' Dimensionals 

italics = retired product

Friday, November 15, 2013

Razzleberry Lemonade

This card was inspired by two challenges: the Pals Paper Arts #179 color challenge (PPA179), and clean & simple layout 265 (FTL265).


This color challenge could be a tricky one... BUT I remembered that the old Razzleberry Lemonade DSP has Crushed Curry and Rich Razzleberry in it! I really don't like this paper... it is just too weird and the color combo is too funky (even for me, miss funkyj!). But, I was able to pull out a couple of patterns that would work for these challenges. I may even do another entry for the color challenge; we'll see.


I kinda like how the scallops on the side DSP pieces match the scallops with all of the punched images.


The little "flowers" or whatever they are were punched out of one of the patterns of DSP. I used the same pattern to make my envelope.


Stamps: Made for You 
Paper: Razzleberry Lemonade DSP, Crumb Cake CS, Crushed Curry CS, Rich Razzleberry Textured CS (but could use the current Core'dinations paper to achieve the same look), Whisper White CS
Colors: Crushed Curry Marker, Rich Razzleberry Marker
Tools: 1" Circle Punch, 1-1/4" Scallop Circle Punch, 1-3/8" Circle Punch, 1-3/4" Scallop Circle Punch, Large Oval Punch, Scallop Oval Punch, Envelope Punch Board
Accessories: Stampin' Dimensionals 

italics = retired product

Thursday, November 7, 2013

Autumn Wreath & Cards (& Sale!)

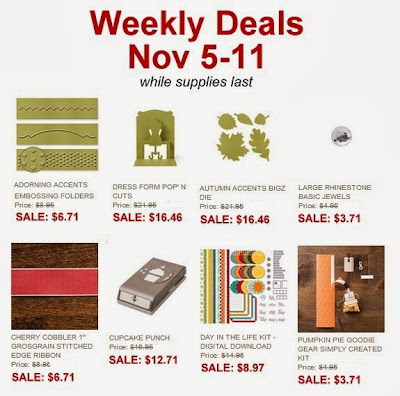
Stampin' Up! is continuing their Weekly Deals! Every Tuesday, look for new items on sale! Here are this week's items:

http://www.stampinup.com/ECWeb/ItemList.aspx?categoryid=1634

My favorite of these items is the Autumn Accents Bigz Die. This is a MUST-HAVE. Check out this awesome wreath I made using this die with Stampin' Up! cardstock and Designer Series Paper. I'm entering my wreath into the current Crafty Creations Challenge - Autumn Colours, and the Crafting for All Seasons Challenge #64 - also Autumn Colours.


Doesn't it look so nice against the natural wood of my current apartment door? :)


I got a styrofoam wreath from Michael's and just used straight pins to attach all the leaves. I made sure to first kind of wrap them around to coat the wreath itself, so the green styrofoam wouldn't show through. Then I just continued adding leaves until I was happy with the look! I wish I had kept track of how many leaves it took, but I did not. My guess is... maybe 150?


Here are some cards that also use the Autumn Accents Bigz Die. This first one uses the Adorning Accents Embossing Folder, which is also on sale. 


Thursday, July 30, 2009

Wow Flowers pack

When Stampin' Up! offers project kits, I seize the opportunity! All the products in the kit already coordinate, so it is that much easier to just sit down and create! Using the "Flower Power Card Elements" together with the Wow Flowers stamp set, I was able to create 17 (!) different cards! All I added was additional cardstock for the card bases, some additional brads, punches, ink, and adhesive. Even though the card kit gives you examples of card layouts, I think it is even more fun to come up with my own! Here are some examples of what I came up with.


Supplies: Flower Power Card Elements kit; Wow Flowers Stamp Set; Perfect Plum, More Mustard, Old Olive, Rose Red, Whisper White Cardstock; Rich Regals and Earth Elements brads; Ice Circles Rhinestone brads; Scallop Circle, 1-3/8" Circle, 1-1/4" Circle, 1" Circle, 1/16" Circle Punches

Saturday, May 23, 2009

Jewelry Color Inspiration #37

Ugh. So, I didn't really know where to start with this color combo, or even what kind of card I wanted to make. Then I found my Printed Window Sheets and checked the Occasions Mini for ideas. So I cased the Happiness card on page 10. I also took some creative liberty with the colors. I just couldn't do the Bashful Blue and Baja Breeze together... So looking at the jewelry again, I went with Baja and Taken with Teal instead.


Ok, so window sheets... not my favorite! How the heck are you supposed to glue these down to anything??? (Seriously, I welcome tips!) I ended up using SNAIL in the section under the ribbon, and then used the 2-Way Glue Pen to dab little dots of glue behind some of the petals/leaves. Which at first showed through, but then it dried. What a pain. Also, not loving the fact that there will inevitably be fingerprints on this forever. I just got an iPhone (YAY!) and am having the same problem with the screen on that! I hate fingerprints!


Also, I'm not in love with the color combo (sorry Stacey!). If I kicked out the Creamy Caramel it may have potential... Oh well, off to bed. In about a week I'll be posting some cards I'm making for a swap which I am much more proud of!

Supplies: Thank You Kindly Stamp Set; Creamy Caramel, Taken with Teal, and Chocolate Chip cardstock; Clearly Thanks Printed Window Sheets; Chocolate Chip Classic Ink Pad; Eyelet Border Punch; Baja Breeze 5/8" Striped Grosgrain Ribbon; Buttons Latte; Flower Fusion Too; Mini Glue Dots; Stampin' Dimensionals